- What Is Dennis Rodman Net Worth
- Filipowski Height
- Nicknames Woman
- Madrid Injury
- Who Is Khloe Kardashian Baby Daddy
- Hurting And Painful Quotes
- Abuja Airport Nigeria
- Highest Iq Ever In The World
- What Happened To Betsy Woodruff Swan
- Quotes From Avatar The Last Airbender Uncle Iroh
Getting your cherished pictures from a desktop or laptop onto your pocket-sized phone can feel like a bit of a puzzle, can't it? You've got all those visual memories stored away, maybe from years of clicking the shutter, and now you want them right there with you, always accessible on your Apple device. It’s a common wish, you know, to have your whole collection of snaps ready to view or share at a moment’s notice.
The good news is that there are, in fact, a few different paths you can take to make this happen. Some ways work best for moving a whole bunch of images at once, like a big family album, while others are just right for sending over a handful of special shots. It really comes down to what feels right for you and how many pictures you're looking to shift, so to speak.
This piece aims to walk you through the most common methods for getting your pictures from your computer onto your iPhone. We'll go over each one in a way that makes it less of a head-scratcher and more like a friendly chat, actually. By the end, you should have a pretty good idea of which approach will work best for your own collection of visual keepsakes.
Why Put Your Pictures on Your Phone?
Having your pictures on your phone simply means you carry your memories with you, doesn't it? Whether it's a picture of a special event, a lovely landscape, or just a funny moment, having it right there in your pocket makes it easy to look back or show someone else. It's about convenience, really, and making sure those moments are always close at hand, you know.
Sometimes, your computer might be where all your older pictures live, perhaps from a time before you had a phone that took such nice shots, or maybe from a separate camera. Moving these older files means giving them new life on a device you use every single day. It’s a way to keep your history close, as a matter of fact, and blend it with your more recent captures.
Plus, sharing becomes so much simpler when your pictures are on your phone. You can quickly send them through messages, post them on social spaces, or just hand your phone to a friend to flip through. It just makes those visual stories much more shareable, and that's a pretty big reason for many people, I mean.
Using Your Computer's Built-In Tools - How to Transfer Photos from Computer to iPhone with Finder or iTunes
For many folks, the most straightforward way to get pictures from a computer to an iPhone involves using the tools that come with your computer. If you have a Mac, this means using Finder. If you have a Windows machine, you'll typically use iTunes. Both methods involve a cable connection, which can feel quite reliable, you know, for moving a good number of visual files.
This approach gives you a fair amount of say over which pictures go onto your phone. You pick the specific folders or collections you want to move, and the computer's program handles the rest. It's a method that has been around for a while, and it works pretty well for making sure your selected images land exactly where you want them on your Apple device, as a matter of fact.
While it does mean plugging in your phone, which some people might find a bit old-fashioned in this wireless age, it's a solid way to manage your visual library. It’s particularly useful if your internet connection isn't always the fastest, or if you have a truly massive collection of pictures you want to shift. It can be quite quick, too, once you get the hang of it.
What You'll Need to Transfer Photos from Computer to iPhone?
Before you start moving your pictures, you'll need a few things ready. First off, you'll need your computer, of course, whether it's a Mac or a Windows machine. Then, you'll need your iPhone itself, with enough free room to hold all the pictures you plan to put on it. That's pretty important, actually, or you might run into some trouble.
You'll also need a proper cable to connect your phone to your computer. This is usually the white cable that came with your iPhone, the one you use for charging. A good, working cable makes a big difference, so, you know, make sure it's not frayed or damaged in any way.
For Mac users, you just need your computer's built-in Finder program, which is already there. Windows users will need to have iTunes installed on their machine. If you don't have it, you can get it from the Microsoft Store or Apple's website. It's free, so that's good, and it's basically the main tool for managing your Apple device on a Windows system.
Steps for Mac Users - How to Transfer Photos from Computer to iPhone
If you're using a Mac to move your pictures, the process is pretty straightforward with Finder. First, you'll want to connect your iPhone to your Mac using that cable we just talked about. Once it's plugged in, you might see a message on your iPhone asking if you trust this computer; just tap "Trust" to continue, if you do, of course.
Next, open a Finder window on your Mac. You should see your iPhone appear in the sidebar on the left side of the window, under "Locations." Click on your iPhone's name there. This brings up a summary screen for your device, basically, showing you different options for what you can do with it.
Now, look for the "Photos" tab at the top of the Finder window. Click on that. You'll see a box that says "Sync Photos to your device from:" and a dropdown menu. Choose "Photos" if you want to sync from your Mac's Photos app, or "Choose folder..." if your pictures are in a different spot on your computer. You can then pick the specific folders or albums you wish to move, which is pretty handy.
After you've picked your picture sources, click the "Apply" or "Sync" button, usually found in the bottom right corner of the Finder window. Your Mac will then start copying those selected visual files over to your iPhone. This might take a little while, depending on how many pictures you're moving, so just be patient, you know, while it works its magic.
Steps for Windows Users - How to Transfer Photos from Computer to iPhone
For those using a Windows computer, iTunes is your go-to program for getting pictures onto your iPhone. Start by plugging your iPhone into your Windows machine with your cable. Just like with a Mac, your iPhone might ask you to "Trust This Computer," so go ahead and confirm that if it pops up, as a matter of fact.
Once connected, open iTunes on your computer. You should see a small iPhone icon near the top left of the iTunes window, usually next to the "Music" or "Library" options. Click on that little phone symbol to select your device. This will bring you to your iPhone's summary page within iTunes, you see.
On the left side of the iTunes window, there's a list of categories. Find and click on "Photos." You'll then see a box to check that says "Sync Photos." Make sure that box has a checkmark in it. Below that, you'll get to choose where your pictures are coming from. You can select "Photos" if you use the Photos app on Windows, or pick a specific folder on your computer where your pictures are stored, which is pretty useful.
After you've made your choices about which folders or albums of pictures you want to move, click the "Apply" or "Sync" button at the bottom right of the iTunes window. iTunes will then begin the process of copying your selected visual files to your iPhone. It's really that simple, though the time it takes can vary based on the number of pictures you're moving, naturally.
Cloud Services - A Wireless Way to Transfer Photos from Computer to iPhone
If you prefer a method that doesn't involve cables, cloud services are a fantastic option for moving pictures from your computer to your iPhone. These services let you upload your pictures to an online space, and then your iPhone can pull them down from there, all without needing to plug anything in. It's quite convenient, you know, for keeping things tidy and wireless.
The beauty of using a cloud service is that your pictures become accessible from pretty much anywhere with an internet connection. So, if you add a picture to your cloud storage from your computer, it will then show up on your iPhone, your tablet, or any other device connected to that same cloud account. It's a very flexible way to manage your visual collections, I mean.
There are a few different cloud services you can use, each with its own benefits. The most common one for iPhone users is iCloud Photos, but other popular options like Google Photos or Dropbox also work really well. It just depends on what you already use or what feels most comfortable for you, in a way.
iCloud Photos - Keeping Everything in Sync
iCloud Photos is Apple's own cloud service, and it's probably the most seamless way to keep your pictures in sync across all your Apple devices. When you turn on iCloud Photos, any picture you take on your iPhone or upload to your computer's Photos app (if you have a Mac) automatically goes up to iCloud. And then, from iCloud, it comes down to all your other devices, too, it's almost magic.
To get pictures from your Windows computer to your iPhone using iCloud Photos, you'll first need to install iCloud for Windows. Once that's on your machine, sign in with your Apple ID. Then, you can choose to sync your computer's picture folders with iCloud Photos. Any pictures you put into those folders will then upload to iCloud and appear on your iPhone, which is pretty neat.
For Mac users, iCloud Photos is built right into the Photos app. Just make sure iCloud Photos is turned on in your Photos app preferences and in your iPhone's settings. Any pictures you import into your Photos app on your Mac will automatically upload to iCloud and then show up on your iPhone. It keeps everything really organized, you know, and always up to date, which is quite nice.
Just a little thing to remember with iCloud Photos is that it uses your iCloud storage space. If you have a lot of pictures, you might need to get more storage, which is a small monthly fee. But for many, the convenience of having everything sync up automatically is well worth it, so, you know, something to consider.
Other Cloud Storage Options - Like Google Photos or Dropbox
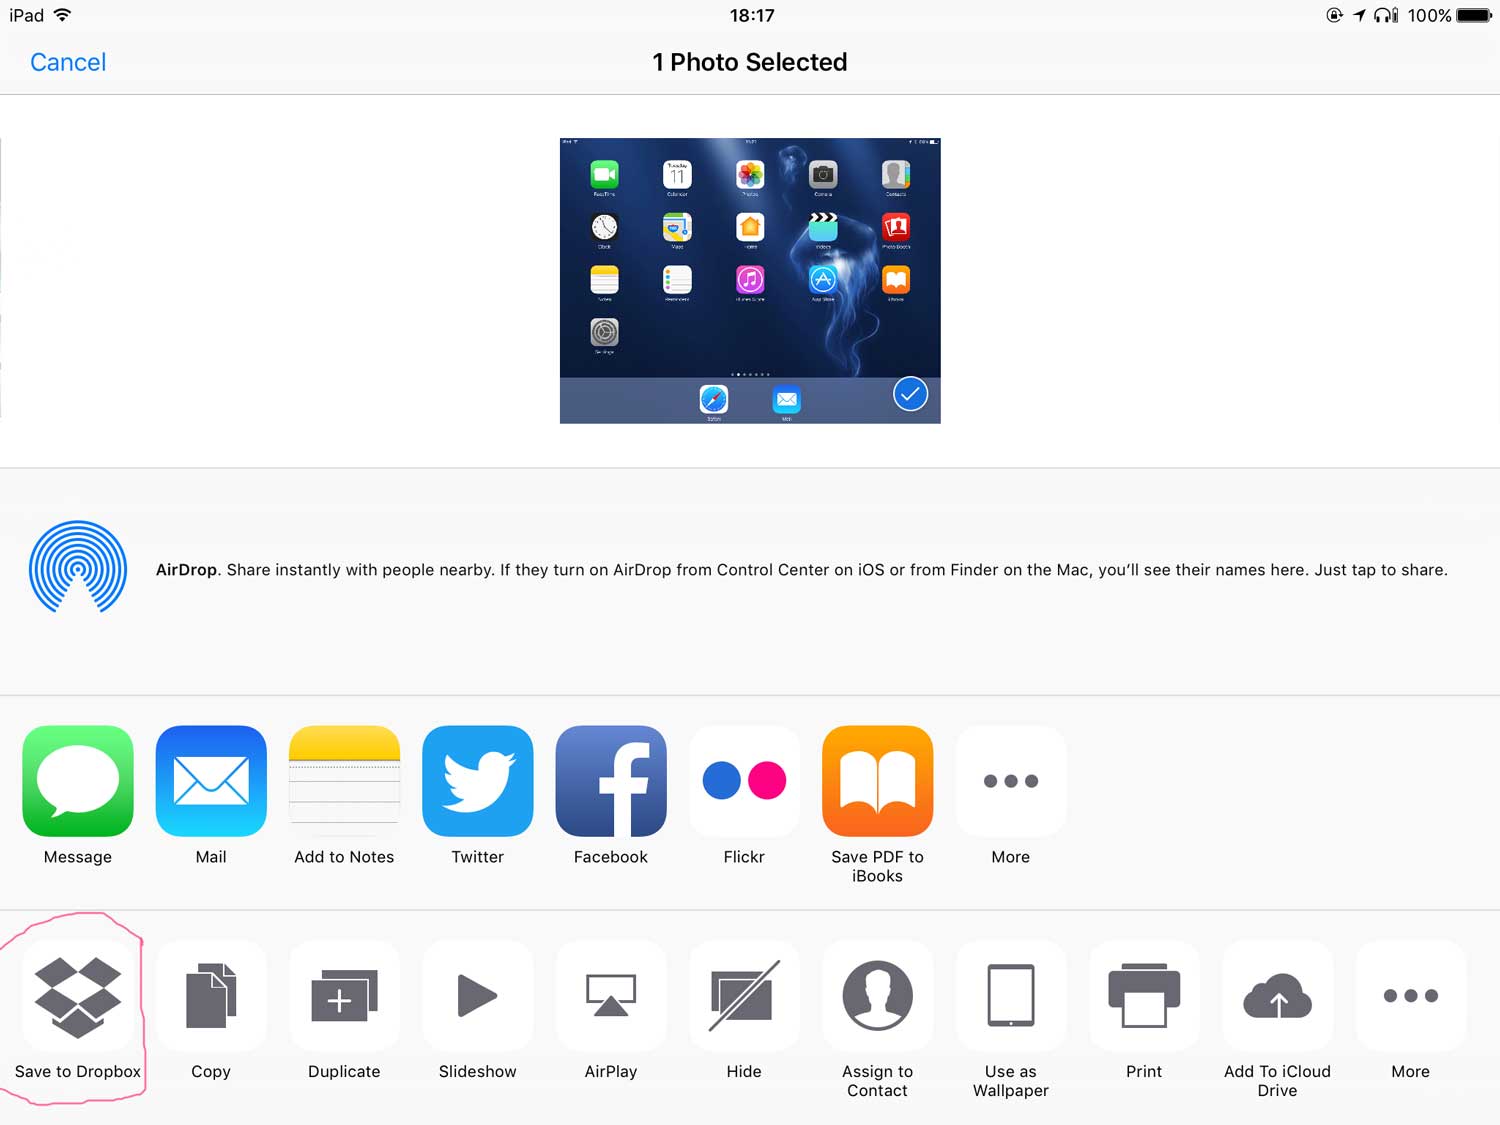
Besides iCloud, there are many other cloud services that can help you move pictures from your computer to your iPhone. Services like Google Photos, Dropbox, or even general file transfer services that allow large file sends, such as those mentioned in some contexts, can be really useful. The basic idea is the same for all of them: you upload your pictures from your computer, and then you access them on your iPhone through the service's app. This works quite well, as a matter of fact.
For Google Photos, you can install a backup and sync tool on your computer that automatically uploads pictures from chosen folders to your Google Photos library. Once those pictures are online, you just open the Google Photos app on your iPhone, and there they are. It’s a very simple way to get your visual files across, and it offers some nice organizing features, too, you know.
Dropbox works similarly. You can put your pictures into your Dropbox folder on your computer,
- Rockstar Pina Colada
- Where Did Dubai Get Its Money
- Madrid Injury
- Conversation To Have With Your Girlfriend
- Video Of Fan Falling

:max_bytes(150000):strip_icc()/iphoneconnectedtomac-5b6097b246e0fb0050e635ce.jpg)
Detail Author:
- Name : Candice Hagenes
- Username : hmcdermott
- Email : plegros@yahoo.com
- Birthdate : 1995-03-10
- Address : 15596 Coby Trail East Dellhaven, WA 59813-3450
- Phone : (320) 709-5717
- Company : Ebert-Powlowski
- Job : Electrotyper
- Bio : Ad et quaerat tenetur expedita est neque sint. Occaecati totam et earum ut magnam molestiae. Temporibus ipsa deleniti eligendi tenetur.
Socials
tiktok:
- url : https://tiktok.com/@davinshields
- username : davinshields
- bio : Distinctio est alias quia rem eum.
- followers : 2255
- following : 1346
instagram:
- url : https://instagram.com/dshields
- username : dshields
- bio : Doloremque animi eum nostrum aliquam tempore. Quia dolore officia repellendus perferendis.
- followers : 6677
- following : 2710
twitter:
- url : https://twitter.com/dshields
- username : dshields
- bio : Consequatur et recusandae minus nulla. Libero et incidunt deserunt quibusdam officia. Sequi deserunt rerum nihil ex temporibus.
- followers : 3436
- following : 290
